RULEBOOK
28 OF 28 PAGES UPLOADED // PERSONAL REFERENCE COPY
The official Nemesis Game Manual cover. Nemesis is a semi-cooperative survival horror board game for 1–5 players designed by Adam Kwapiński and published by Awaken Realms. Players are crew members aboard a spacecraft overrun by hostile alien organisms. Each player has secret objectives and must decide how much to trust — or betray — their crewmates to survive.
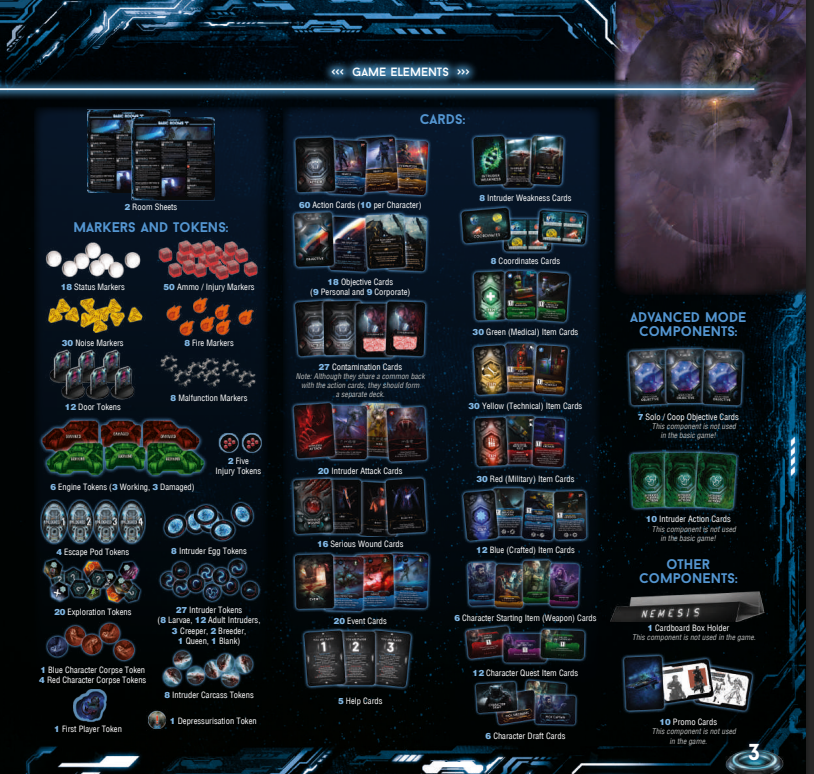
Full table of contents with page references for every rules section. Followed by a complete component overview: the double-sided game board, 6 character boards, 11 Type-1 and 9 Type-2 room tiles, the Intruder Board, Intruder Bag, Scanner, plastic inventory card holders, 1 Combat Die (D6), and 1 Noise Die (D10). Miniatures: 6 character sculpts (Captain, Pilot, Scientist, Scout, Soldier, Mechanic), 6 Larvae, 3 Creepers, 8 Adult Intruders across 4 sculpts, 2 Breeders, and 1 Queen. Colored plastic rings distinguish each player's owned items on the board.
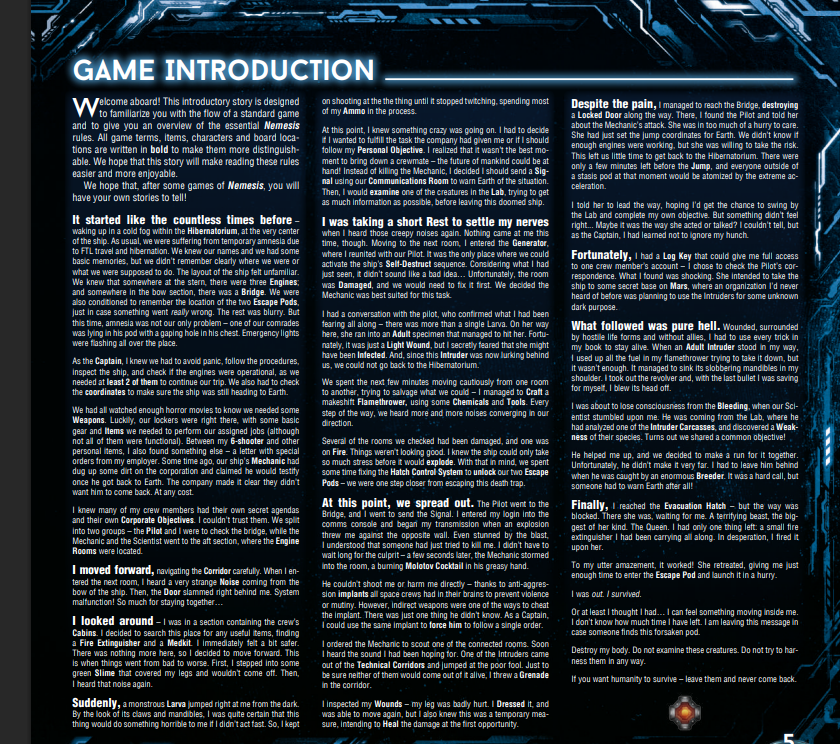
A first-person narrative written from the Captain's perspective that walks through a complete game session as a story. Covers: waking in the Hibernatorium with no memory, discovering the ship is in crisis, splitting the crew to investigate the engines and bridge, encountering a Larva and a contaminated crewmate, navigating fire-damaged corridors, weighing personal vs. corporate objectives under pressure, engaging an Adult Intruder in combat with a revolver, suffering a Bleeding Serious Wound, and making a desperate run to the Escape Pod. All key game terms are bolded in context — Personal Objective, Corporate Mission, Noise, Contamination, Serious Wound, Escape Pod — so new players can connect the story beats to the mechanics they'll learn in the rules sections that follow.
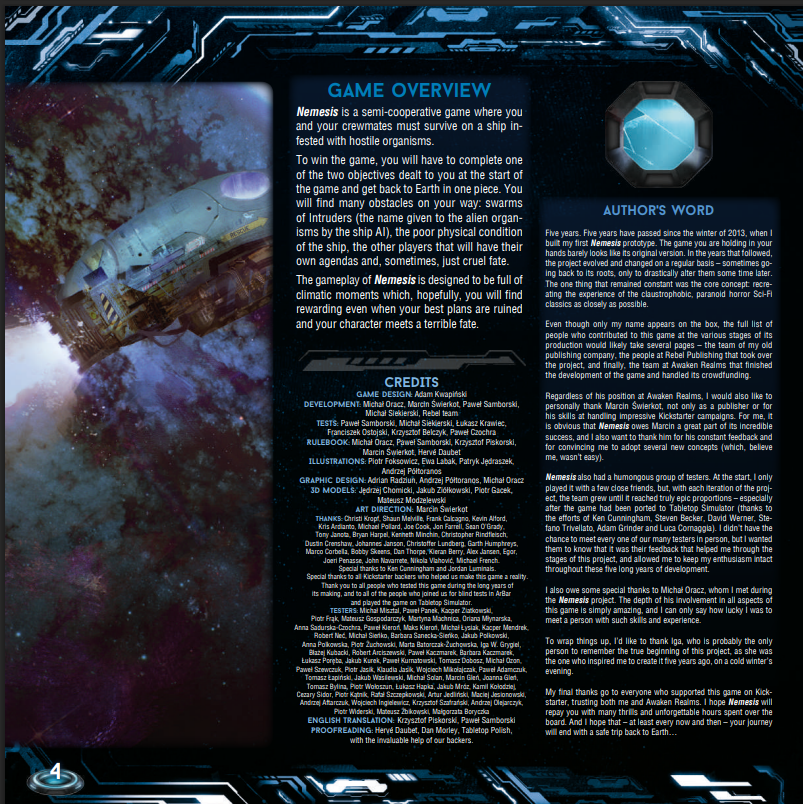
Explains the core premise: all players are stranded on a ship overrun by hostile organisms and must survive long enough to escape back to Earth. Each player has two secret objectives — completing at least one and escaping alive is required to win. Players may cooperate or work against each other depending on their hidden agendas. The game is designed to generate dramatic, story-driven moments even when — especially when — everything goes wrong. Includes full production credits covering game design, development, art, 3D sculpting, graphic design, and localization teams, plus the designer's personal note on the five-year journey from a 2013 prototype to the final published game.

Step-by-step board setup for the start of every game. Step 1: place the board basic-side up (identified by the red arrow in the upper-left corner). Steps 2–3: shuffle and randomly place all Type-2 room tiles face-down on "2" slots, then place all Type-1 tiles on "1" slots. Step 4: shuffle Exploration Tokens face-down and place one on each room slot. Step 5: place one Coordinates Card face-down on the Cockpit space. Step 6: place a Status Marker on the "B" space of the Destination Track. Step 7: place Escape Pod tokens by player count (2 players = 2 pods, 3 = 3, 4 = 4, 5 = 4), alternating between sections A and B, locked-side up. Step 8: place both Engine tokens numbered "1" face-down on Engine slots — players must not know which engines are functional. Step 9: set up the Intruder Board with 5 Egg tokens, 3 random face-down Weakness Cards, and 5 Larva tokens in the bag. Step 10: load the Intruder Bag with 1 Blank, 4 Larvae, 1 Creeper, 1 Queen, and 3 Adults, plus 1 additional Adult per player. Step 11: shuffle and place the Item decks (Green, Yellow, Red) and Event, Intruder Attack, Serious Wound, and Contamination decks face-down. Place the Scanner next to the Contamination deck. Step 12: place all remaining markers, tokens, and dice next to the board. Step 13: place a Status Marker on the green space of the Time Track.

A full visual diagram of the completely set-up game board. Use this as a reference during setup to confirm every component is in the correct position. Shows the Hibernatorium, Cockpit, Engine rooms, Escape Pod bays, Technical Corridor network, room tile grid, all tracks (Time, Self-Destruct, Destination), and all token/deck placement locations. Keep this page visible while working through the setup steps on p.5 and p.8.
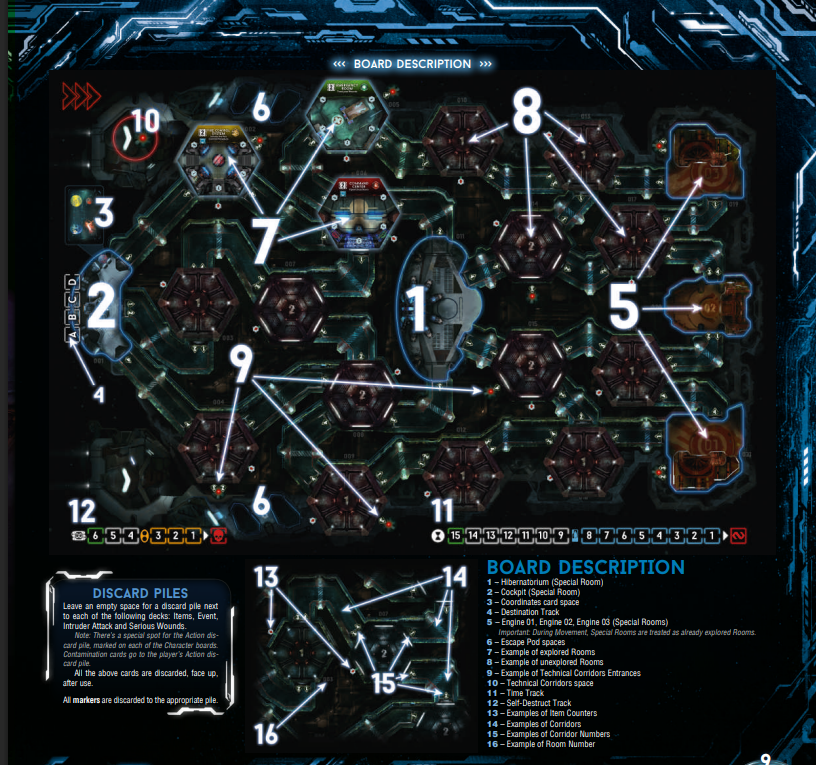
A full annotated diagram of the completely set-up game board with numbered callouts identifying every zone and component placement. Key: 1 = Hibernatorium (Special Room), 2 = Cockpit (Special Room), 3 = Coordinates Card space, 4 = Destination Track, 5 = Engine 01/02/03 slots (Special Rooms — treated as already explored during Movement), 6 = Escape Pod spaces, 7 = example of an explored room (tile face-up), 8 = example of an unexplored room (tile face-down), 9 = Technical Corridor entrances, 10 = Technical Corridors space, 11 = Time Track, 12 = Self-Destruct Track, 13 = Item Counter examples, 14 = Corridor examples, 15 = Corridor Number examples, 16 = Room Number example. Also explains Discard Piles: each deck has a designated discard space next to it; Action Cards and Contamination Cards go to the player's own Action discard pile on their Character Board; all markers return to the general supply.

The second half of setup covering individual player preparation. Step 14: deal Help Cards equal to player count — the number shown determines player order and inventory size for the draft. Step 15: each player takes a plastic Inventory Card Holder matching their Help Card number. Step 16: remove Objective Cards showing numbers higher than the player count; deal each player 1 Corporate and 1 Personal Objective — keep both secret. On first Intruder encounter, one objective must be discarded. Step 17: shuffle Character Draft Cards; Player 1 takes 2 random cards, picks one, shuffles the other back; continue until all players have a character. Step 18: each player takes (A) their Character Board, (B) their character miniature placed in the Hibernatorium in a colored ring, (C) their Action Card deck shuffled face-down, (D) their Starting Weapon Card with Ammo markers loaded, (E) their 2 Quest Item Cards placed horizontally — inactive until unlocked via mini-quests. Step 19: Player 1 takes the First Player Token. Step 20: place the blue Character Corpse Token for each character in the Hibernatorium.
A second full annotated board diagram showing the complete game board with additional callouts clarifying component placement details not covered on p.7. Reinforces the spatial relationships between the Hibernatorium, Cockpit, Engine rooms, Escape Pod bays, Technical Corridor network, and the room tile grid. Useful as a quick visual reference during setup to confirm every element is in the correct position before the first round begins.
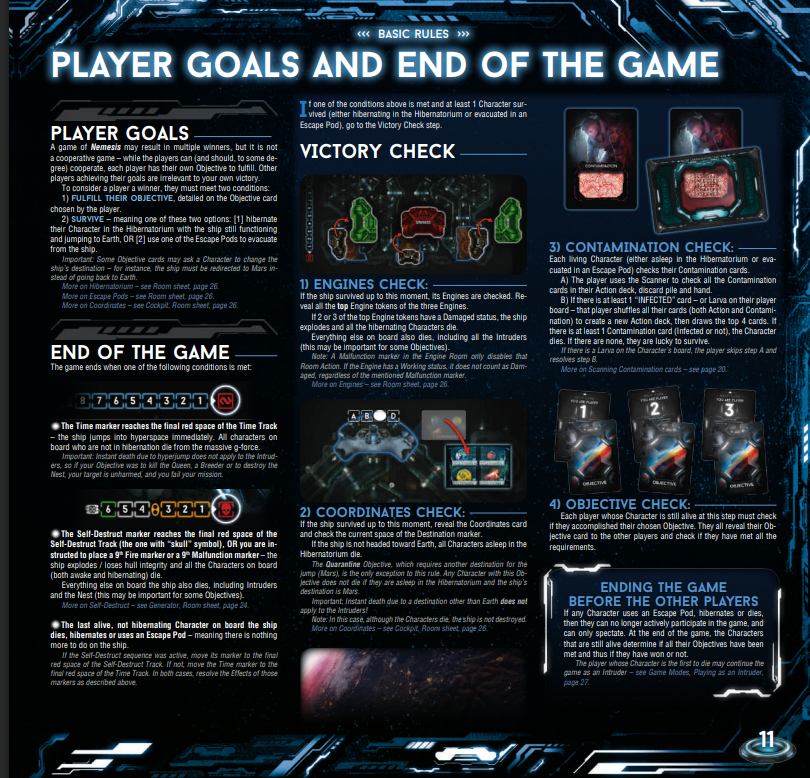
Defines what it means to win. Nemesis may have multiple winners — it is not purely cooperative. To win, a player must: (1) fulfill their chosen Objective card AND (2) survive by either hibernating in the Hibernatorium with the ship jumping to Earth, or evacuating in an Escape Pod. The game ends when: the Time Track reaches its final red space (all non-hibernating characters die from g-force), the Self-Destruct Track reaches its final red space (ship explodes), or the last non-hibernating character dies or hibernates. Victory Check sequence: 1) Engines Check — reveal top Engine tokens of all three engines; if 2 or 3 are Damaged, the ship explodes. 2) Coordinates Check — reveal the Coordinates card; if not headed to Earth, all hibernating characters die (exception: Quarantine Objective sends ship to Mars). 3) Contamination Check — each surviving character uses the Scanner to check their Contamination cards; if any Infected card appears, that character dies. 4) Objective Check — each surviving player reveals their Objective card and checks if all conditions are met. Characters who escape via Escape Pod, hibernate, or die can no longer actively participate — they spectate and find out their fate at the end.
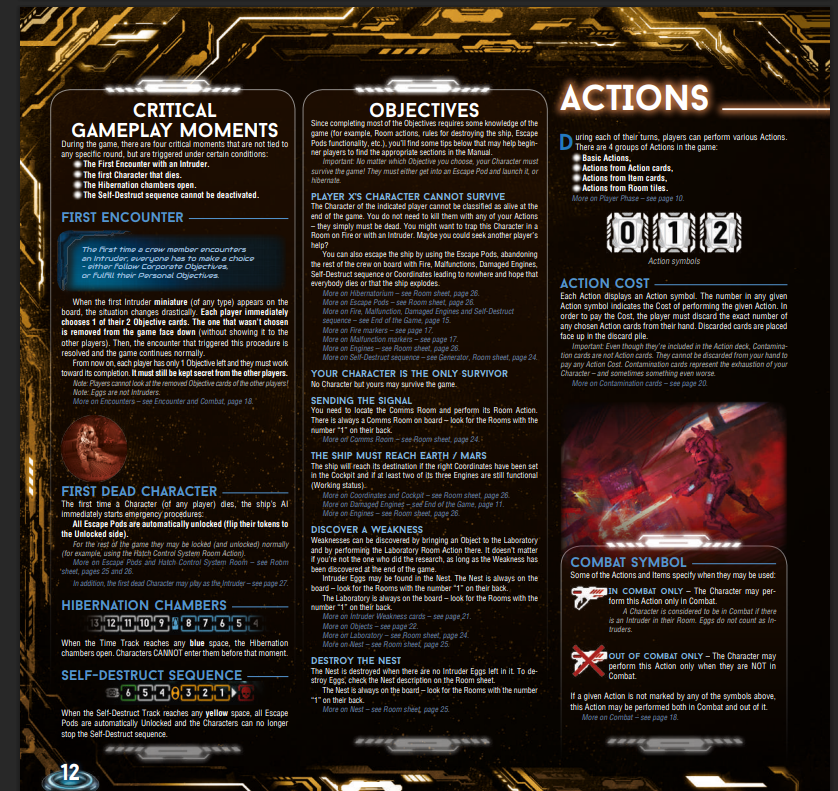
Four critical moments that trigger automatically during any game: (1) First Encounter — the first time any Intruder miniature appears on the board, every player immediately chooses 1 of their 2 Objective cards to keep; the other is removed face-down. (2) First Dead Character — the first time any character dies, all Escape Pods automatically unlock. (3) Hibernation Chambers Open — when the Time Track reaches a blue space, the Hibernatorium becomes accessible. (4) Self-Destruct Sequence Cannot Be Deactivated — when the Self-Destruct Track reaches yellow, all Escape Pods unlock and the sequence cannot be stopped. Objectives section covers: Room Actions needed for most objectives (Hibernatorium, Cockpit, Engines, Lab, Nest, Comms); sending the signal via the Comms Room; the ship reaching Earth/Mars via Coordinates and 3 working Engines; discovering Intruder Weaknesses via the Laboratory; and destroying the Nest by removing all Intruder Eggs. Actions overview: each turn a player performs Actions across 4 groups — Basic Actions, Actions from Action Cards, Actions from Item Cards, Actions from Room Tiles. Action Cost = number of Action cards discarded from hand. Combat Symbol clarifies which actions require being In Combat vs. Out of Combat.

Complete reference for all Basic Actions. Outside-of-Combat: MOVEMENT (cost 1) — move to a neighboring Room; CAREFUL MOVEMENT (cost 2) — like Movement but place a Noise marker in a chosen Corridor instead of rolling Noise, cannot be used in Combat; PICK UP HEAVY OBJECT (cost 1) — take 1 Heavy Object from your Room (Character Corpse, Intruder Carcass, or Intruder Egg); TRADE (cost 1) — exchange Items and Objects with Characters in the same Room, both must agree; CRAFT ITEM (cost 1) — discard 2 Item cards with matching blue Craft symbols to gain the corresponding Crafted Item card. Regardless-of-Combat: SHOOT (cost 1) — attack an Intruder in your Room using a Weapon, discarding an Ammo marker; MELEE ATTACK (cost 1) — attack an Intruder in your Room with bare hands or improvised weapon. Actions from Action Cards: each character has 10 unique Action cards; to perform one, discard it face-up and pay its cost; each card has two sections separated by OR — the player picks one. Contamination cards are NOT Action cards and cannot be discarded to pay Action costs. Actions from Item Cards: some Items allow specific Actions described on the card. Actions from Room Tiles: most Rooms have a Room Action described on the Room sheet (p.24).
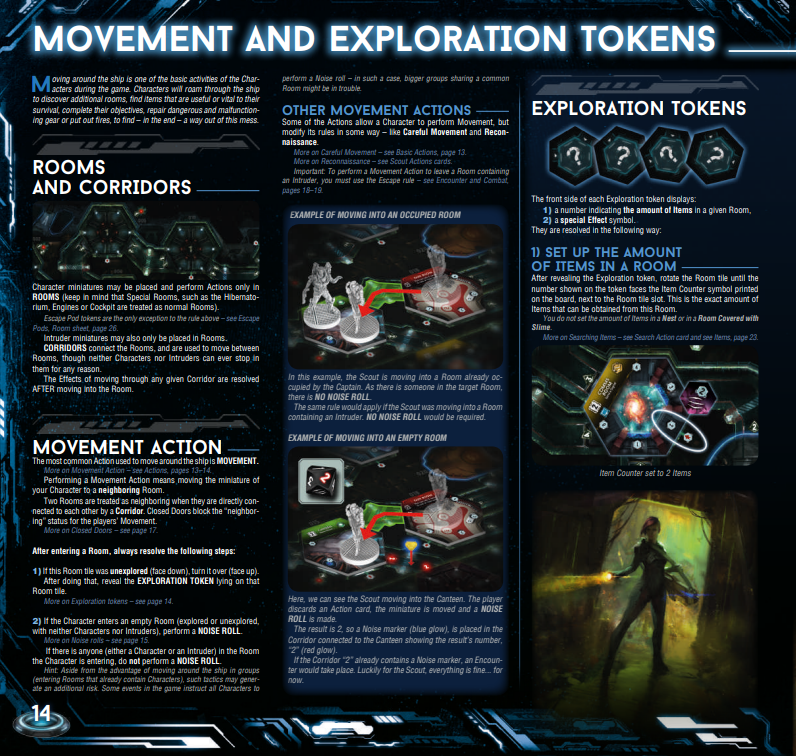
Movement fundamentals: characters may only be placed and perform Actions in Rooms. Corridors connect Rooms but neither Characters nor Intruders can ever stop in a Corridor. Effects of moving through a Corridor are resolved AFTER entering the destination Room. Movement Action steps: (1) If the Room tile is unexplored (face-down), flip it face-up, then reveal the Exploration Token. (2) If the character enters an empty Room (no Characters, no Intruders), perform a Noise Roll. If anyone is already in the Room being entered, do NOT perform a Noise Roll. To leave a Room containing an Intruder, use the Escape rule (p.18–19) instead of Movement. Exploration Tokens: each token shows (1) a number indicating the amount of Items in that Room and (2) a special Effect symbol. Resolving the token: first rotate the Room tile until the number matches the Item Counter symbol on the tile. Then resolve the special Effect — Silence (nothing), Danger (Encounter if Intruder nearby, otherwise Noise marker), Slime (Status marker on Character board), Fire (place Fire marker), Malfunction (place Malfunction marker), Doors (place Door token in the Corridor just entered). Exploration tokens are removed after being resolved — each Room is only explored once.
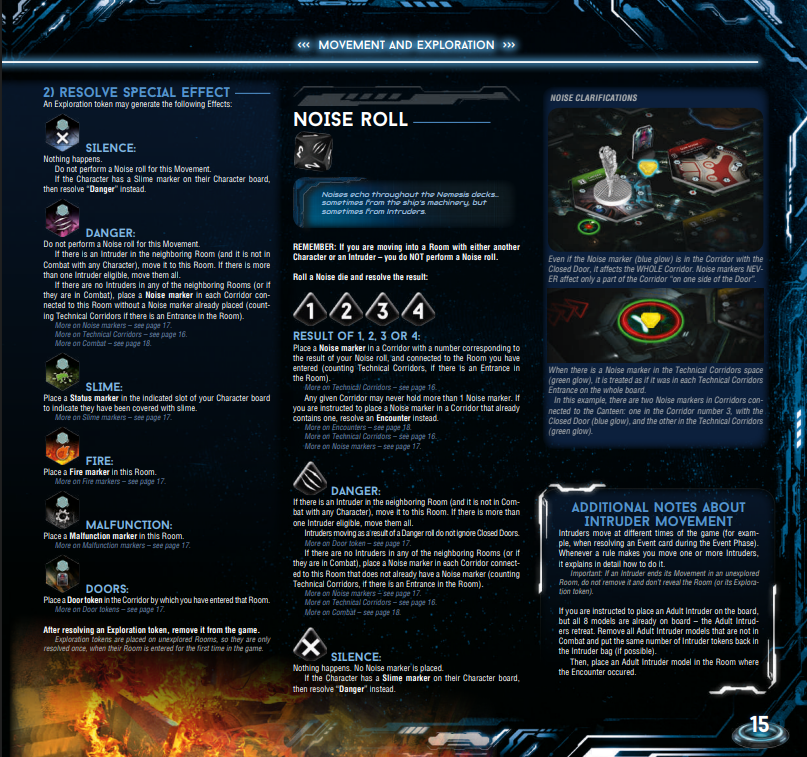
Noise Roll: roll the Noise Die (D10) and place a Noise marker in the Corridor connected to your Room whose number matches the result. Any Corridor may never hold more than 1 Noise marker — if the target Corridor already has one, resolve an Encounter instead. If moving into a Room with another Character or Intruder already present, do NOT perform a Noise Roll. Danger result: if an Intruder is in a neighboring Room and not in Combat, move it to your Room; if more than one is eligible, move them all. If no eligible Intruders exist, place a Noise marker in each connected Corridor that does not already have one. Silence result: no Noise marker placed; if the Character has a Slime marker, resolve Danger instead. Noise Clarifications: a Noise marker in a Corridor with a Closed Door affects the WHOLE Corridor. A Noise marker in the Technical Corridors space (green glow) is treated as if it was in each Technical Corridors Entrance on the whole board. Additional Notes on Intruder Movement: Intruders move at different times (e.g. Event Phase). If an Intruder ends Movement in an unexplored Room, do not reveal the Room tile or Exploration token. If all 8 Adult models are already on the board when a new Adult must be placed, all Adults not in Combat retreat to the Intruder Bag, then place one Adult at the Encounter location.
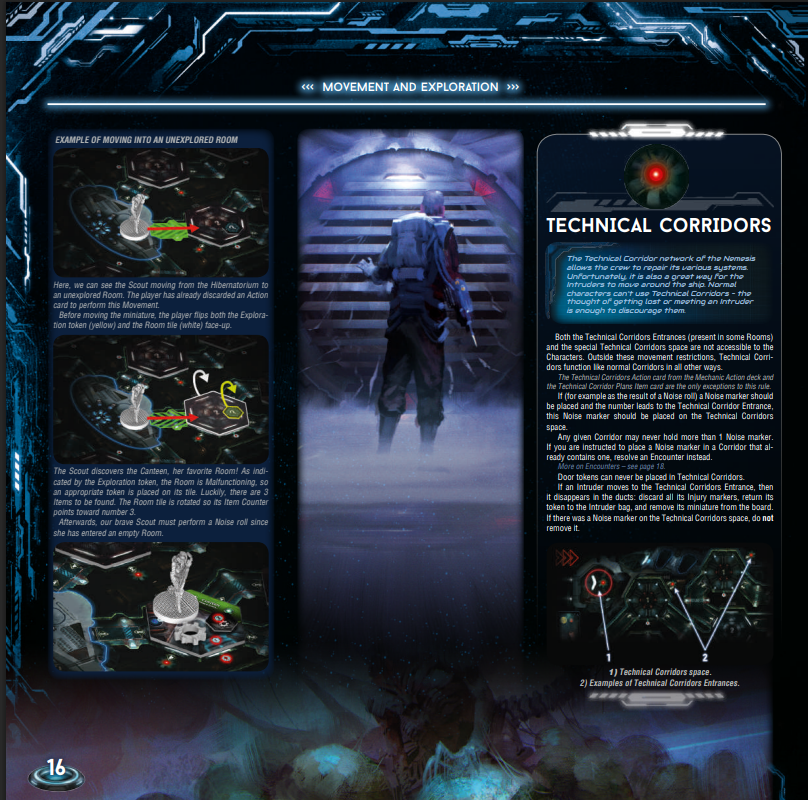
Detailed rules for the Technical Corridor network — the maintenance passages running throughout the ship that only Intruders (and certain character abilities) can use freely. The Technical Corridors space on the board is not accessible to Characters. Technical Corridor Entrances (present in some Rooms) are the only exceptions — Characters may enter them via the Technical Corridors Action card or the Technical Corridor Plans item. In all other ways, Technical Corridors function like normal Corridors. Key rules: Door tokens can never be placed in Technical Corridors. If an Intruder moves to a Technical Corridors Entrance, it disappears into the ducts — return its token to the Intruder Bag, remove its miniature, and do NOT remove any Noise marker on the Technical Corridors space. Also includes a full illustrated example of moving into an unexplored Room: the Scout moves from the Hibernatorium, flips both the Exploration token and Room tile face-up, discovers the Room is Malfunctioning with 3 Items, rotates the tile to align the Item Counter, and then performs a Noise roll since the Room is empty.
Complete rules for all five hazard token types. NOISE MARKER: the only function is to mark Corridors for the Noise Roll rule — see p.15. SLIME MARKER: while a Character has a Slime marker, each Silence result on a Noise roll is treated as Danger instead. A Character may only have 1 Slime marker at a time; remove it via the Clothes Item card or a Shower Room Action. FIRE MARKER: three functions — (1) every time a Character ends their turn in a Room with Fire, they suffer 1 Light Wound; (2) during each Event Phase, each Intruder in a Fire Room suffers 1 Injury; (3) if there are 8 Fire markers in the game and no more in the pool, the ship explodes and the game ends. Any Room may hold at most 1 Fire marker. MALFUNCTION MARKER: two functions — (1) the Room's Search Action is no longer available; (2) if there is a Malfunction in a Room with a Computer, the Computer is unavailable. Malfunction markers cannot be placed in the Nest or in a Room covered with Slime. There are 8 Malfunction markers; if all are placed and another must be added, the game ends. DOOR TOKEN: placed only in Corridors; each Corridor may hold at most 1. Doors have three states — Open (no token), Closed (standing token, blocks movement), and Destroyed (lying token, movement allowed). Closed Doors prevent Characters and Intruders from moving through; when one or more Intruders try to move through a Closed Door, they do not move but destroy the Door instead. Destroyed Doors cannot be closed again (exception: Plasma Torch item). Door tokens are ignored when resolving Encounters.

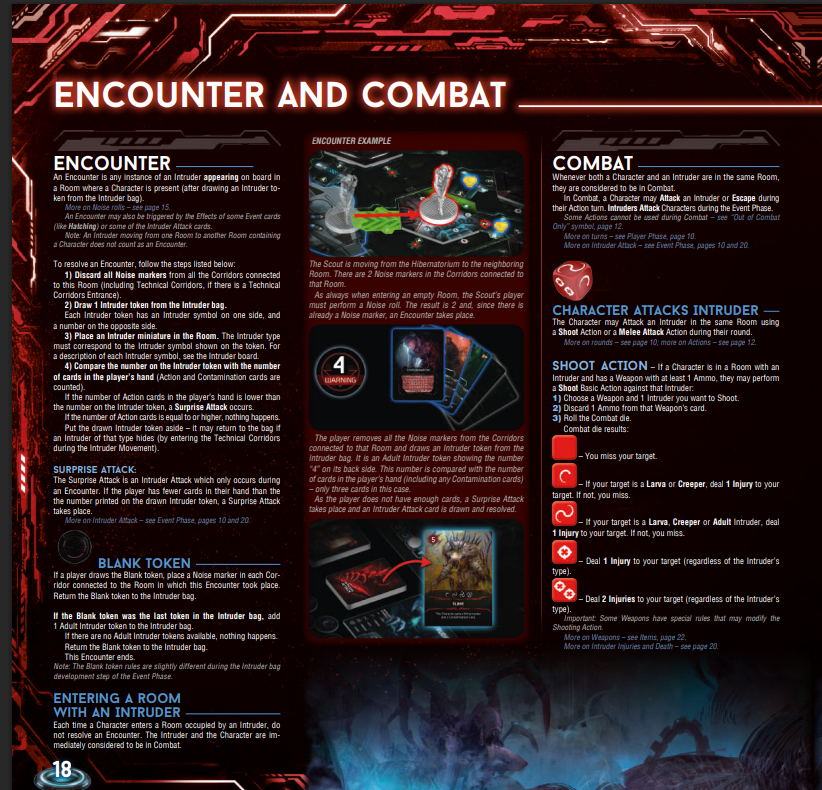
ENCOUNTER: triggered any time an Intruder token appears on the board in a Room where a Character is present (after drawing from the Intruder Bag via a Noise roll), or by certain Event cards. Moving from one Room to another containing an Intruder does NOT trigger an Encounter — the Character and Intruder are immediately In Combat. To resolve an Encounter: (1) Discard all Noise markers from all Corridors connected to this Room (including Technical Corridors if there is an entrance). (2) Draw an Intruder token from the Intruder Bag. (3) Place an Intruder miniature in the Room — the type must match the Intruder symbol on the token. (4) Compare the number on the Intruder token with the number of cards in the player's hand (Action and Contamination cards counted) — if the player has fewer Action cards than the number on the token, a SURPRISE ATTACK occurs and an Intruder Attack card is drawn immediately. BLANK TOKEN: place a Noise marker in each Corridor connected to the Room, return the Blank token to the bag. If the Blank was the last token, add 1 Adult Intruder token to the bag. ENTERING A ROOM WITH AN INTRUDER: no Encounter is resolved — Character and Intruder are immediately In Combat. COMBAT: whenever both a Character and an Intruder are in the same Room, they are In Combat. In Combat, a Character may Attack an Intruder or Escape during their Action turn. SHOOT ACTION: (1) Choose a Weapon and 1 Intruder to Shoot. (2) Discard 1 Ammo from that Weapon's card. (3) Roll the Combat die. Results: red square = miss + 1 Serious Wound; orange circle (Larva/Creeper) = 1 Injury, otherwise miss + 1 Serious Wound; orange double-circle (Larva/Creeper/Adult) = 1 Injury, otherwise miss + 1 Serious Wound; green cross = 1 Injury regardless of type; green double-cross = 2 Injuries regardless of type.
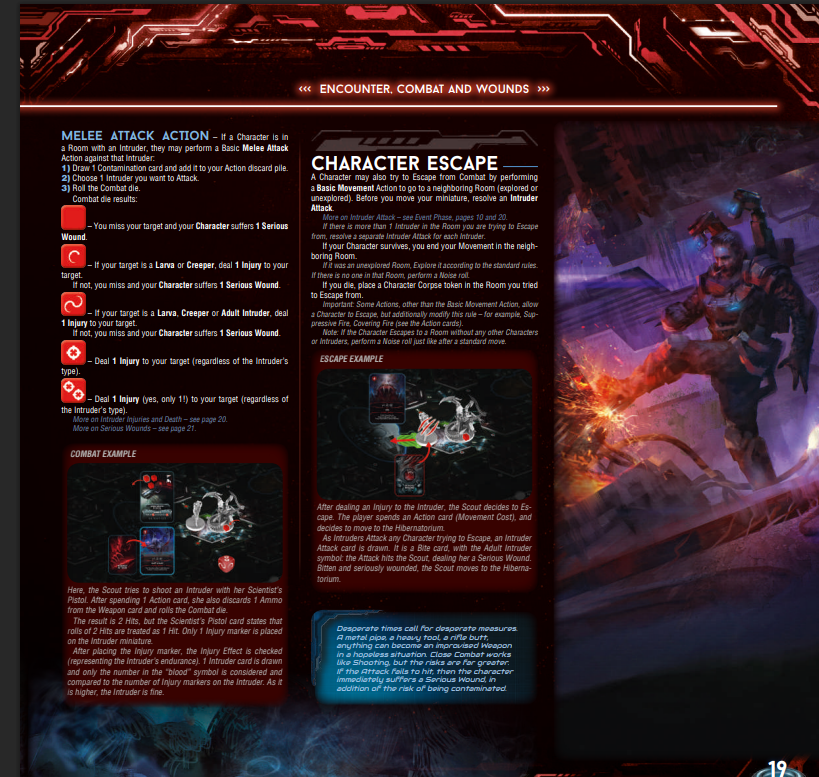
MELEE ATTACK ACTION: (1) Draw 1 Contamination card and add it to your Action discard pile. (2) Choose 1 Intruder to Attack. (3) Roll the Combat die. Results: red square = miss + 1 Serious Wound; orange circle (Larva/Creeper) = 1 Injury, otherwise miss + 1 Serious Wound; orange double-circle (Larva/Creeper/Adult) = 1 Injury, otherwise miss + 1 Serious Wound; green cross = 1 Injury regardless; green double-cross = 1 Injury (yes, only 1!) regardless. Includes a detailed COMBAT EXAMPLE: the Scout tries to shoot an Intruder with her Scientist's Pistol, discards 1 Action card and 1 Ammo, rolls 2 Hits — but the Pistol states 2 Hits = 1 Injury, so 1 Injury marker is placed on the Intruder. The Injury Effect is checked using the "blood" symbol on the drawn Intruder Attack card compared to current Injury markers. CHARACTER ESCAPE: a Character may try to Escape from Combat by performing a Basic Movement Action to go to a neighboring Room (explored or unexplored). Before moving the miniature, resolve an Intruder Attack against the escaping Character. If there is more than 1 Intruder in the Room, resolve a separate Intruder Attack for each. If the Character survives, they end their Movement in the neighboring Room. If the destination was unexplored, Explore it according to standard rules. If the Character dies during Escape, place a Character Corpse token in the Room they tried to Escape from. Note: some Actions other than Basic Movement (e.g. Suppressive Fire, Covering Fire) also allow Escape but modify the rules. A Character who Escapes to a Room without any other Characters or Intruders performs a Noise roll just like a standard move.
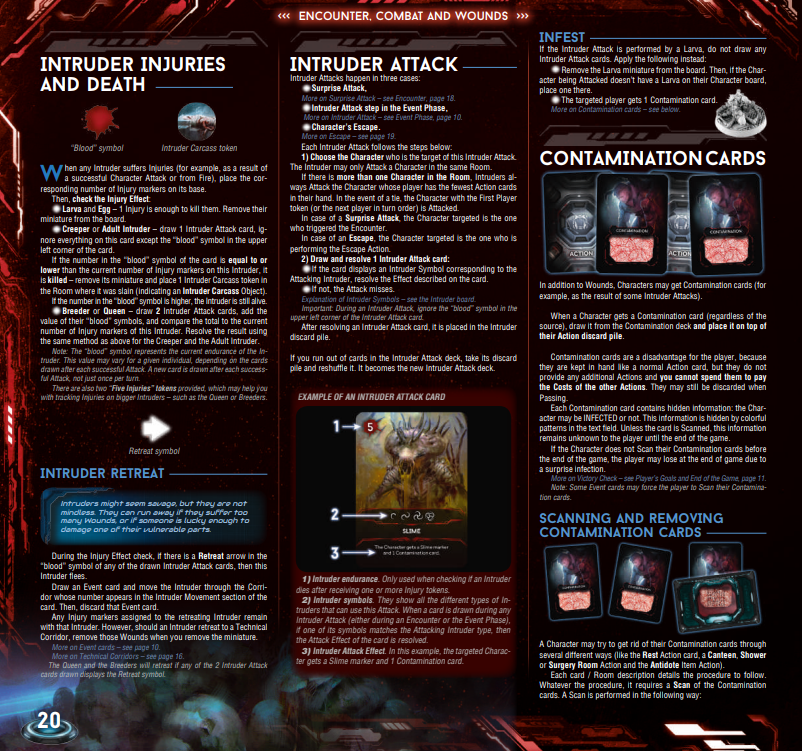
INTRUDER INJURIES AND DEATH: when an Intruder suffers Injuries (from a Character Attack or Fire), place the corresponding number of Injury markers on its base. Then check the Injury Effect: Larva and Egg — 1 Injury kills them, remove the miniature from the board. Creeper or Adult Intruder — draw 1 Intruder Attack card; ignore everything on this card except the "blood" symbol in the upper-left corner. If the number in the "blood" symbol is equal to or lower than the current number of Injury markers on this Intruder, it is killed — remove its miniature and place 1 Intruder Carcass token in the Room. If higher, the Intruder is still alive. Breeder or Queen — draw 2 Intruder Attack cards, add the "blood" symbol values together, compare to current Injury markers. Note: the "blood" symbol represents the current endurance of the Intruder — it may vary for a given individual depending on the cards drawn after each successful Attack. A new card is drawn after each successful Attack, not just once per turn. There are also two "Rookies" tokens that may help track Injuries on bigger Intruders. INTRUDER RETREAT: if there is a Retreat arrow in the "blood" symbol of any drawn Intruder Attack card, the Intruder retreats through the Corridor whose number appears in the Intruder Movement section of that card, then discard the Event card. Any Injury markers assigned to the retreating Intruder remain with it. The Queen and Breeders will retreat if any of the 2 Intruder Attack cards drawn displays the Retreat symbol. INFEST: if the Intruder Attack is performed by a Larva, do not draw any Intruder Attack cards — instead remove the Larva miniature from the board, and if the Character doesn't have a Larva on their Character board, place one there; the targeted player gets 1 Contamination card. CONTAMINATION CARDS: Characters may get Contamination cards as a result of some Intruder Attacks. When a Character gets a Contamination card (regardless of the source), draw it from the Contamination deck and place it on top of their Action discard pile. Contamination cards are a disadvantage — they provide no additional Actions and cannot be spent to pay the costs of other Actions, but may still be discarded when Passing. Each Contamination card contains hidden information: the Character may be INFECTED or not — this information is hidden by colorful patterns in the text field and remains unknown to the player until the end of the game. If the Character does not Scan their Contamination cards before the end of the game, the player may lose at the end of game due to a surprise infection.

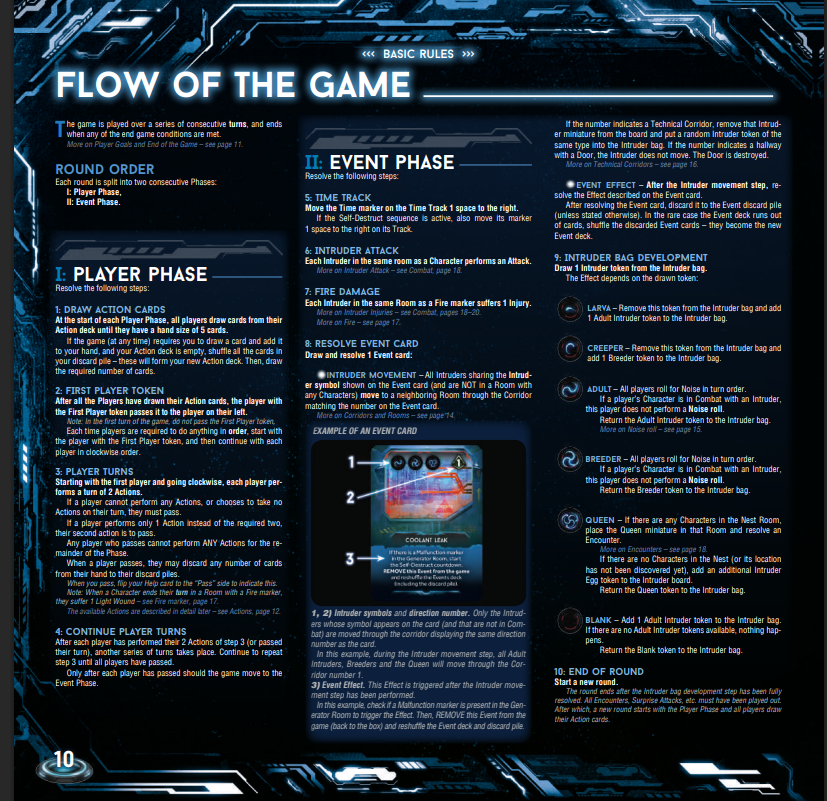
The complete round structure. Each round splits into two consecutive Phases. I. PLAYER PHASE — Step 1: Draw Action Cards — at the start of each Player Phase, all players draw from their Action deck until they have a hand size of 5 cards. If the deck runs out, shuffle the discard pile to form a new deck, then draw the required number. Step 2: First Player Token — after all players have drawn, pass the First Player token to the player on the left. Note: on the very first turn of the game, do not pass the token. Step 3: Player Turns — starting with the First Player and going clockwise, each player performs a turn of 2 Actions, OR 1 Action and pass, OR pass. After passing, a player does not take part in any subsequent turn this round. When a player passes, they may discard any number of cards from hand to their discard pile. Step 4: Continue Player Turns — after each player has performed their 2 Actions (or passed), repeat Step 3 until all players have passed. Only after all players have passed does the game move to the Event Phase. II. EVENT PHASE — Step 5: Time Track — move the Time marker 1 space to the right; if the Self-Destruct sequence is active, also move its marker 1 space. Step 6: Intruder Attack — each Intruder in the same Room as a Character performs an Attack. Step 7: Fire Damage — each Intruder in a Room with a Fire marker suffers 1 Injury. Step 8: Resolve Event Card — draw and resolve 1 Event card. INTRUDER MOVEMENT symbol: all Intruders sharing the Intruder symbol shown on the Event card (and not in Combat) move to a neighboring Room through the Corridor matching the number on the Event card. If the number indicates a Technical Corridor, remove that Intruder from the board and put a random Intruder token of the same type into the Intruder Bag. If the number indicates a hallway with a Door, the Intruder does not move — the Door is destroyed. EVENT EFFECT: resolve the Effect described on the Event card; after resolving, discard it (unless stated otherwise). If the Event deck runs out, shuffle the discarded Event cards — they become the new Event deck. Step 9: Intruder Bag Development — draw 1 Intruder token from the Intruder Bag and resolve its Effect: LARVA — remove from bag, add 1 Adult token to the bag. CREEPER — remove from bag, add 1 Breeder token to the bag. ADULT — all Adult players roll for Noise in turn order; if a Character is in Combat with an Intruder, that player does not perform a Noise roll; return the Adult token to the bag. BREEDER — all players roll for Noise in turn order; same Combat exception; return the Breeder token to the bag. QUEEN — if there are any Characters in the Nest Room, place the Queen miniature there and resolve an Encounter; if there are no Characters in the Nest (or its location has not been discovered yet), add an additional Intruder Egg token to the Intruder board; return the Queen token to the bag. BLANK — add 1 Adult Intruder token to the bag; return the Blank token to the bag. Step 10: End of Round — start a new round. The round ends after the Intruder bag development step has been fully resolved. All Encounters, Surprise Attacks, etc. must have been played out. After which, a new round starts with the Player Phase and all players draw their Action cards.
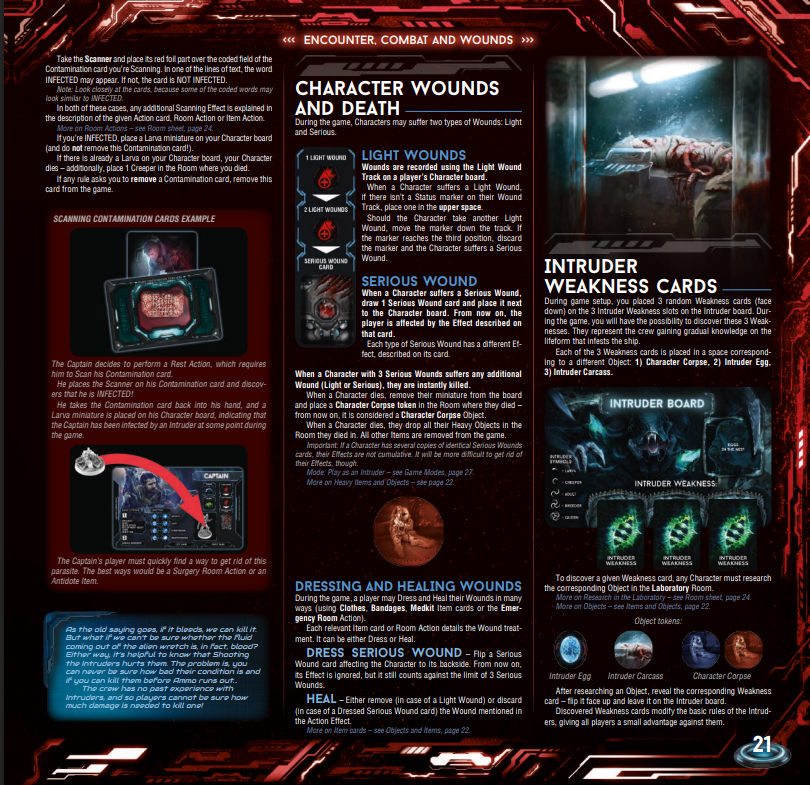
CHARACTER WOUNDS AND DEATH: Characters may suffer two types of Wounds — Light and Serious. LIGHT WOUNDS: recorded using the Light Wound Track on the Character board. When a Character suffers a Light Wound, if there is no Status marker on their Wound Track, place one. Should the Character take another Light Wound, move the marker down the track. If the marker reaches the third position, discard the marker and the Character suffers a Serious Wound. SERIOUS WOUND: when a Character suffers a Serious Wound, draw 1 Serious Wound card and place it next to the Character board — from now on, the player is affected by the Effect described on the card. Each type of Serious Wound has a different Effect. When a Character with 3 Serious Wounds suffers any additional Wound (Light or Serious), they are instantly killed. When a Character dies: remove their miniature from the board and place a Character Corpse token in the Room where they died. When a Character dies, they drop all their Heavy Objects in the Room they died in. All other Items are removed from the game. DRESSING AND HEALING WOUNDS: a player may Dress and Heal their Wounds using Clothes, Bandages, Medkit items or the Emergency Room Action. DRESS SERIOUS WOUND: flip a Serious Wound card to its backside — from now on, its Effect is ignored, but it still counts against the limit of 3 Serious Wounds. HEAL: either remove (in case of a Light Wound) or discard (in case of a Dressed Serious Wound card) the Wound mentioned in the Action Effect. INTRUDER WEAKNESS CARDS: during setup, 3 random Weakness cards are placed face-down on the 3 Intruder Weakness slots on the Intruder board. During the game, players will have the possibility to discover these 3 Weaknesses — they represent the crew gaining gradual knowledge on the lifeform that infests the ship. Each of the 3 Weakness cards is placed in a space corresponding to a different Object: 1) Character Corpse, 2) Intruder Egg, 3) Intruder Carcass. To discover a given Weakness card, any Character must research the corresponding Object in the Laboratory Room. After researching an Object, reveal the corresponding Weakness card — flip it face up and leave it on the Intruder board. Discovered Weakness cards modify the basic rules of the Intruders, giving all players a small advantage against them. SCANNING CONTAMINATION CARDS: take the Scanner and place its red foil part over the coded field of the Contamination card you are Scanning. In one of the lines of text, the word INFECTED may appear. If not, the card is NOT INFECTED. If you are INFECTED, place a Larva on your Character board (and do not remove this Contamination card!). If there is already a Larva on your Character board, your Character dies — additionally, place 1 Creeper in the Room where you died. If any rule asks you to remove a Contamination card, remove this card from the game.
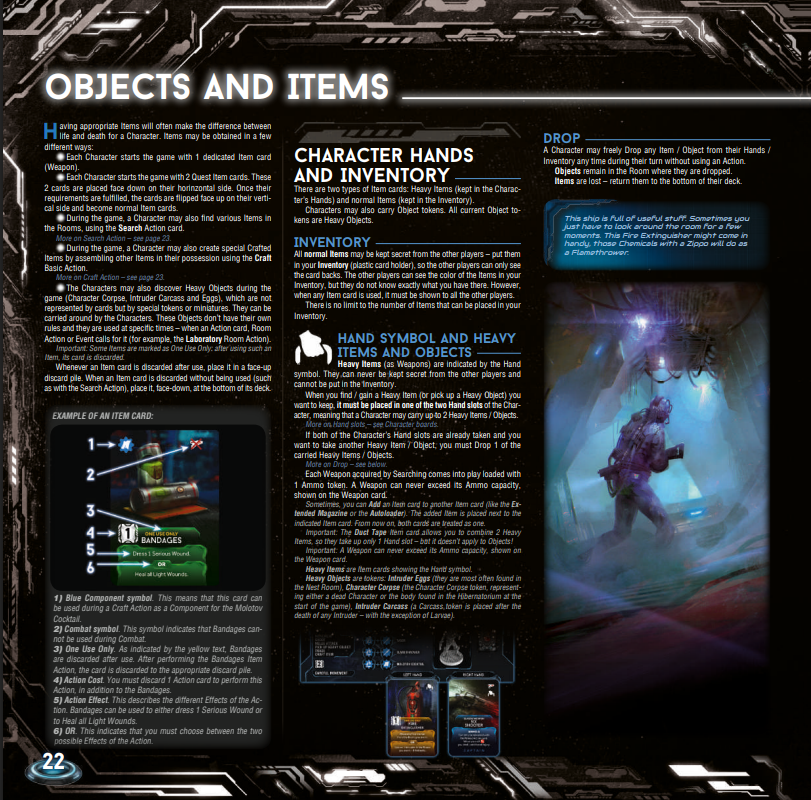
OBJECTS AND ITEMS: having appropriate Items will often make the difference between life and death for a Character. Items may be obtained in a few different ways: each Character starts the game with 1 dedicated Item card (Weapon); each Character starts the game with 2 Quest Item cards (placed face-down on their horizontal side — when their requirements are fulfilled, the cards are flipped face up on their vertical side and become normal Item cards); during the game, a Character may find various Items in Rooms using the Search Action; during the game, a Character may also create special Crafted Items by assembling other Items in their possession using the Craft Basic Action; Characters may also discover Heavy Objects during the game (Character Corpse, Intruder Carcasses and Eggs), which are not represented by cards but by special tokens or miniatures. CHARACTER HANDS AND INVENTORY: there are two types of Item cards — Heavy Items (kept in the Character's Hands) and normal Items (kept in the Inventory). Characters may also carry Object tokens — all current Object tokens are Heavy Items. INVENTORY: all normal Items may be kept secret from the other players — put them in your Inventory (plastic card holder), so the other players can only see the card backs. The other players can see the color of the Items in your Inventory, but do not know exactly what you have there. However, when any Item card is used, it must be shown to all the other players. There is no limit to the number of Items that can be placed in your Inventory. HAND SYMBOL AND HEAVY ITEMS AND OBJECTS: Heavy Items (such as Weapons) are indicated by the Hand symbol. They can never be kept secret from the other players and cannot be placed in the Inventory. When you find/gain a Heavy Item (or pick up a Heavy Object) you want to keep, it must be placed in one of the two Hand slots of the Character, meaning that a Character can carry up to 2 Heavy Items/Objects. If both Hand slots are already taken and you want to take another Heavy Item/Object, you must Drop 1 of the carried Heavy Items/Objects. DROP: a Character may freely Drop any Item/Object from their Hands/Inventory any time during their turn without using an Action. Objects remain in the Room where they are dropped. Items are lost — return them to the bottom of their deck.
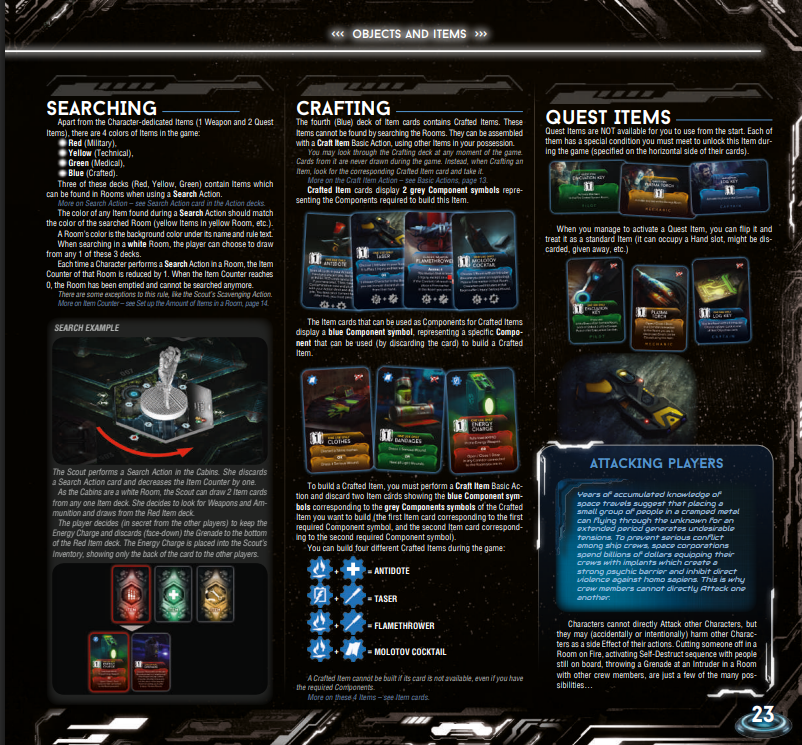
SEARCHING: apart from the Character-dedicated Items (1 Weapon and 2 Quest Items), there are 4 colors of Items in the game: Red (Military), Yellow (Technical), Green (Medical), Blue (Crafted). Three of these decks (Red, Yellow, Green) contain Items which can be found in Rooms when using a Search Action. The color of any Item found during a Search Action should match the color of the searched Room (yellow Items in yellow Room, etc.). A Room's color is the background color under its name and rule text. When searching in a white Room, the player can choose to draw from any 1 of these 3 decks. Each time a Character performs a Search Action in a Room, the Item Counter of that Room is reduced by 1. When the Item Counter reaches 0, the Room has been emptied and cannot be searched anymore. CRAFTING: the fourth (Blue) deck of Item cards contains Crafted Items. These Items cannot be found by searching the Rooms. They can be assembled with a Craft Item Basic Action, using other Items in your possession. Cards from a Craft Item deck are never drawn at the beginning of the game. Instead, when Crafting an Item, look for the corresponding Crafted Item card and take it. Crafted Item cards display a blue Component symbol, representing a specific Component that can be used (by discarding the card) to build a Crafted Item. To build a Crafted Item, you must perform a Craft Item Basic Action and discard two Item cards showing the blue Component symbols corresponding to the grey Components symbols of the Crafted Item you want to build. You can build four different Crafted Items during the game: Antidote, Taser, Flamethrower, Molotov Cocktail. QUEST ITEMS: Quest Items are NOT available for you to use from the start. Each of them has a special condition you must meet to unlock this Item during the game (specified on the horizontal side of their cards). When you manage to activate a Quest Item, you can flip it and treat it as a standard Item (it can occupy a Hand slot, might be discarded, given away, etc.). ATTACKING PLAYERS: Characters cannot directly Attack other Characters, but they may (accidentally or intentionally) harm other Characters as a side Effect of their actions. Cutting someone off in a Room on Fire, activating Self-Destruct sequence with people still on board, throwing a Grenade at an Intruder in a Room with other crew members, are just a few of the many possibilities.
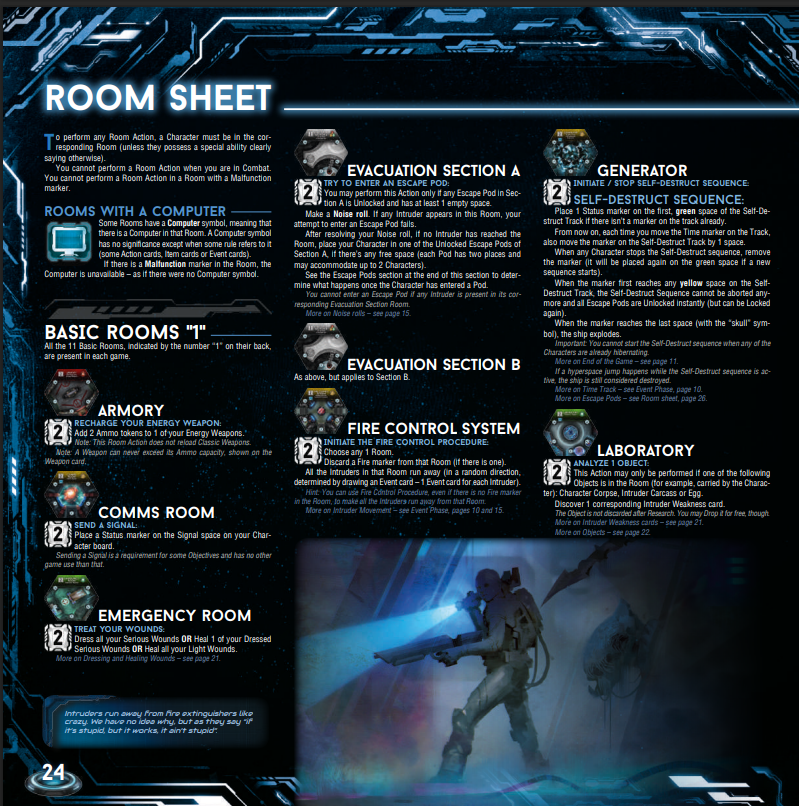
ROOM SHEET: to perform any Room Action, a Character must be in the corresponding Room (unless they possess a special ability clearly saying otherwise). You cannot perform a Room Action when you are in Combat. You cannot perform a Room Action in a Room with a Malfunction marker. ROOMS WITH A COMPUTER: some Rooms have a Computer symbol, meaning that there is a Computer in that Room. A Computer symbol has no significance except when some rule refers to it (some Action cards, Item cards or Event cards). If there is a Malfunction in the Room, the Computer is unavailable — as if there were no Computer symbol. BASIC ROOMS "1" — all 11 Basic Rooms, indicated by the number "1" on their back, are present in each game: ARMORY (cost 2) — Recharge Your Energy Weapon: add 2 Ammo tokens to 1 of your Energy Weapons. A Weapon can never exceed its Ammo capacity. COMMS ROOM (cost 2) — Send a Signal: place a Status marker on the Signal space on your Character board. Sending a Signal is a requirement for some Objectives and has no other game use than that. EMERGENCY ROOM (cost 2) — Treat Your Wounds: dress all your Serious Wounds OR Heal 1 of your Dressed Serious Wounds OR Heal all your Light Wounds. NEST (cost 2) — Take One Egg: take 1 Egg token from the Intruder board, then perform a Noise roll. When there are no more Eggs in the Nest (they have all been carried away or destroyed), the Nest is considered destroyed — place 1 Injury marker in the Nest to represent this. DESTROYING EGGS: whenever your Character is in a Room with any uncarried Eggs (not carried by any Character), you can try to destroy these Eggs. Resolve this Action as a Shoot Action or Melee Attack Action. Each Injury (of any type) destroys 1 Egg. STORAGE (cost 2) — Search for an Item: draw 2 cards from the Item deck of a chosen color (Red, Yellow or Green). Pick 1 card and put the other at the bottom of the deck. SURGERY (cost 2) — Perform a Surgery Procedure: scan all Contamination cards (from your Action deck, hand and discard pile). Remove all Infected cards. If you have a Larva on your Character board, remove it. After Scanning, your Character suffers 1 Light Wound and you automatically pass. Shuffle all your Action cards (including those in your hand and discard pile) and place them as a new Action deck. Note: After a Surgery procedure you always pass your turn, and your hand is empty until the start of the next round.

ADDITIONAL ROOMS "2": these 9 Room tiles are indicated by the number "2" on their back. Only some of them are used in each game — the number used depends on the player count. These Rooms are randomly placed face-down during setup. LABORATORY (cost 2) — Research an Object: take 1 Object (Intruder Egg, Intruder Carcass, or Character Corpse) from your Hand slot and place it on the corresponding Intruder Weakness slot on the Intruder board. Reveal the corresponding Intruder Weakness card — flip it face up. This Weakness now applies to all Intruders for the rest of the game. Note: you cannot perform a Search Action in this Room. SHOWER ROOM (cost 1) — Remove Your Slime Marker: remove the Slime marker from your Character board. HATCH SYSTEM (cost 2) — Manually Unlock an Escape Pod: choose 1 Locked Escape Pod and flip it to its Unlocked side. GENERATOR (cost 2) — Activate Self-Destruct Sequence: move the Self-Destruct marker to the first space of the Self-Destruct Track. Note: you cannot activate the Self-Destruct Sequence if it is already active. DEACTIVATE SELF-DESTRUCT SEQUENCE: move the Self-Destruct marker off the Self-Destruct Track. Note: you cannot deactivate the Self-Destruct Sequence if the marker has already reached the yellow space. COMPUTER ROOM (cost 2) — Access Ship's Computer: look at the top card of any 1 deck (Item, Event, Intruder Attack, or Serious Wound). You may put it at the bottom of the deck. CARGO BAY (cost 2) — Search for an Item: draw 3 cards from the Item deck of a chosen color (Red, Yellow, or Green). Pick 1 card and put the others at the bottom of the deck. KITCHEN (cost 1) — Eat Something: remove all your Light Wounds. TRAINING ROOM (cost 2) — Train: draw 3 Action cards from your Action deck. Keep 1 and put the others at the bottom of your Action deck. Note: if your Action deck has fewer than 3 cards, draw all of them. TECHNICAL CORRIDOR PLANS (cost 2) — Study the Plans: take the Technical Corridor Plans Item card. While you have this card in your Inventory, you may use Technical Corridor Entrances as if they were normal Corridors (move through them to the Technical Corridors space and from the Technical Corridors space to any Technical Corridor Entrance on the board).
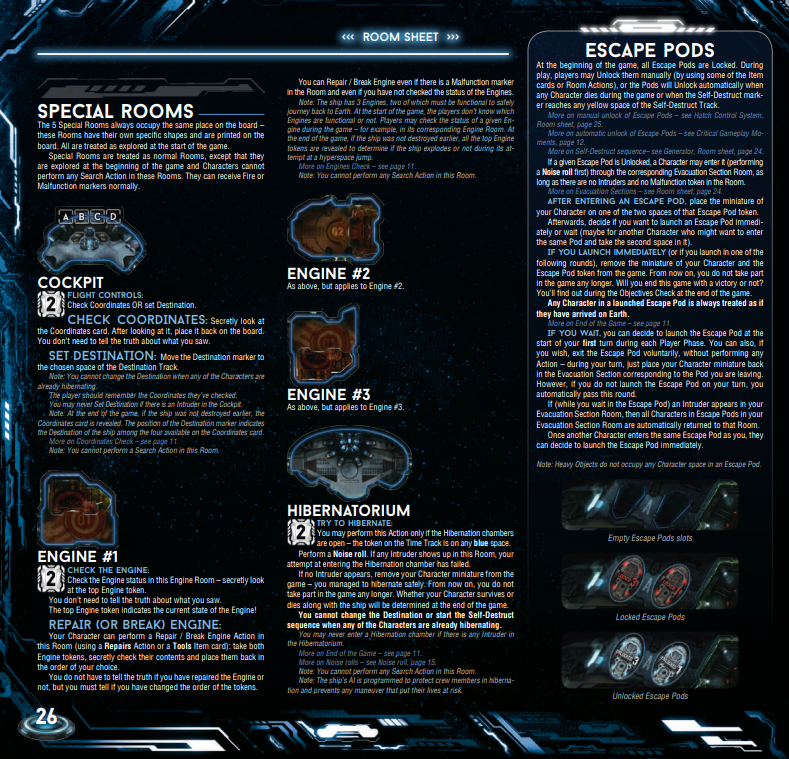
SPECIAL ROOMS: the 5 Special Rooms always occupy the same place on the board — Hibernatorium, Cockpit, Engine #1, Engine #2, Engine #3. They are treated as already explored at the start of the game and can never have Search Actions performed in them. They can receive Fire and Malfunction markers normally. COCKPIT (cost 2) — CHECK COORDINATES: secretly look at the Coordinates card, then place it back face-down. SET DESTINATION: move the Destination marker to the chosen space of the Destination Track. You cannot change the Destination when any Characters are already hibernating. ENGINE #1/2/3 (cost 2) — CHECK THE ENGINE: secretly look at the top Engine token. REPAIR (OR BREAK) ENGINE: take both Engine tokens, secretly check their contents and place them back in the order of your choice. You can Repair/Break even if there is a Malfunction marker or if you have not checked the Engine status. The ship has 3 Engines, two of which must be functional to safely journey back to Earth. HIBERNATORIUM (cost 2) — TRY TO HIBERNATE: may only perform this Action when the Hibernation chambers are open (Time Track on any blue space). Perform a Noise roll. If no Intruder appears, remove your Character miniature — you managed to hibernate safely. You cannot change the Destination or start the Self-Destruct sequence when any Characters are already hibernating. You may never enter a Hibernation chamber if there is any Intruder in the Hibernatorium. ESCAPE PODS: at the beginning of the game, all Escape Pods are Locked. During play, players may Unlock them manually (via Item cards or Room Actions), or the Pods will Unlock automatically when any Character dies or the Self-Destruct marker reaches any yellow space. If an Escape Pod is Unlocked, a Character may enter it (performing a Noise roll first) through the corresponding Evacuation Section Room, as long as there are no Intruders and no Malfunction token in the Room. AFTER ENTERING AN ESCAPE POD, place your miniature on one of the two spaces of that Escape Pod token. Decide immediately or wait whether to launch. IF YOU LAUNCH IMMEDIATELY, remove your Character and the Escape Pod token — you no longer take part in the game. IF YOU WAIT, you can decide to launch at the start of your first turn during each Player Phase. Any Character in a launched Escape Pod is always treated as if they have arrived on Earth. Heavy Objects do not occupy any Character space in an Escape Pod.
SOLO MODE: while Nemesis is a standard semi-cooperative game, you can also try to survive alone. This mode has its own special Solo/Coop Objectives — at the start of the game, draw two cards from this deck instead of the regular Objective cards. Once the first Encounter occurs, you must choose one of these two Objectives. Important: in this mode, the number of Items available in each Room is reduced by half, rounded up (if the Exploration token shows 1–2 Items, set the Item Counter to 1; if 3–4, set it to 2). To win, you must fulfill your Objective and survive. FULLY COOPERATIVE MODE: for players who want a fully cooperative experience without fear of betrayal. Uses its own special Solo/Coop Objectives deck — one card per player instead of regular Objective cards; these cards are public information. To win, ALL these Objectives must be fulfilled and at least 1 Character must survive. Note: if there is one card requiring you to send the Signal, only one Character must do it. REVIVE: in this fully cooperative mode, the Emergency Room is equipped with a specialized AutoDoc device, allowing the crew to revive any near-death person. Whenever one of the Characters dies, another Character might pick up their Corpse token and carry it to the working Emergency Room. A player whose Corpse is in the Emergency Room places their Character miniature there at the start of the next round — all their Light Wounds are discarded and all their Serious Wounds are Dressed. Important: the Emergency Room does not work if there is an Intruder or a Malfunction token in it. PLAYING AS AN INTRUDER: intended to allow the first eliminated player to keep playing by controlling the Intruders, slightly increasing difficulty for all remaining players. The player whose Character dies first gets to control the Intruders infesting the ship and can hunt down the other players. SET UP: the Intruder player removes all their former Character components, shuffles the special Intruder Player Action deck and places it in front of them. Then finish the current round according to standard rules — any changes are applied only at the start of the next Player Phase. ROUND ORDER — PLAYER PHASE: (1) Draw Action cards: the Intruder player draws 3 cards, max 4, hand limit 4. (2) First Player Token: omitted during this Phase (the Intruder is never the First Player). (3) Player Turns: the Intruder player follows the standard order of play but can only take 1 Action (by playing a card from their hand) or pass. When passing, the Intruder player may keep 1 card from their hand and discard the rest. During their turn, the Intruder player can play an Intruder Action card in one of three ways: MOVE — move any Intruder through a Corridor with a number matching the one printed on the Intruder Action card. ATTACK — choose any Intruder in the same Room as a Character; the Intruder Attacks that Character following standard rules with one exception: the Intruder player draws a number of Intruder Attack cards equal to the number displayed on the Intruder player card played this round, then chooses 1 of these cards to be resolved and puts all the others at the bottom of the Intruder Attack deck. The chosen Character is Attacked regardless of whether the others are in the room. EFFECT — resolve the effect described on the Intruder Action card. EVENT PHASE: almost all of the entire Event Phase is omitted, except the Time Track and Fire Damage. TIME TRACK: move the Time marker and Self-Destruct marker (if active) 1 space to the right. FIRE DAMAGE: just like in the standard rules, every Intruder in a Room with a Fire marker suffers 1 Injury. Note: all other steps do not apply in this mode specifically — Intruders do not Attack at the end of the turn (but they still make Surprise Attacks during Encounters or when Characters Escape from Rooms with Intruders); Event cards are not used unless as a result of Intruder Player Action card Effects; there is no Intruder bag development step. VICTORY CONDITION: the player controlling the Intruders cannot fully win the game — their goal is to ensure that no other players win. After all, if you have already lost, you better make sure all the other players get the same treatment!

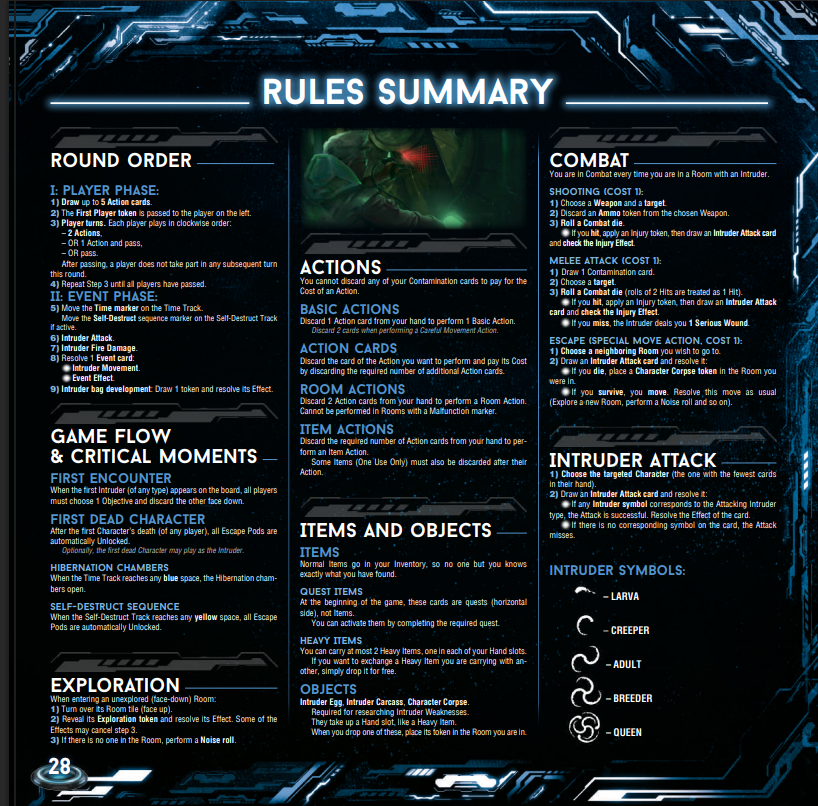
A complete one-page rules summary covering all key mechanics. ROUND ORDER — I. PLAYER PHASE: (1) Draw up to 5 Action cards. (2) The First Player token is passed to the player on the left. (3) Player turns — each player plays in clockwise order: 2 Actions, OR 1 Action and pass, OR pass. After passing, a player does not take part in any subsequent turn this round. (4) Repeat Step 3 until all players have passed. II. EVENT PHASE: (5) Move the Time marker on the Time Track. Move the Self-Destruct sequence marker on the Self-Destruct Track if active. (6) Intruder Attack. (7) Intruder Fire Damage. (8) Resolve 1 Event card: Intruder Movement or Event Effect. (9) Intruder bag development: draw 1 token and resolve its Effect. GAME FLOW & CRITICAL MOMENTS — FIRST ENCOUNTER: when the first Intruder (of any type) appears on the board, all players must choose 1 Objective and discard the other face down. FIRST DEAD CHARACTER: after the first Character's death (of any player), all Escape Pods are automatically Unlocked. Optionally, the first dead Character may play as the Intruder. HIBERNATION CHAMBERS: when the Time Track reaches any blue space, the Hibernation chambers open. SELF-DESTRUCT SEQUENCE: when the Self-Destruct Track reaches any yellow space, all Escape Pods are automatically Unlocked. EXPLORATION: when entering an unexplored (face-down) Room: (1) Turn over its Room tile (face up). (2) Reveal its Exploration token and resolve its Effect — some of the Effects may cancel step 3. (3) If there is no one in the Room, perform a Noise roll. ACTIONS — BASIC ACTIONS: discard 1 Action card from your hand to perform 1 Basic Action (discard 2 cards when performing a Careful Movement Action). ACTION CARDS: discard the card of the Action you want to perform and pay its Cost by discarding the required number of additional Action cards. ROOM ACTIONS: discard 2 Action cards from your hand to perform a Room Action — cannot be performed in Rooms with a Malfunction marker. ITEM ACTIONS: discard the required number of Action cards from your hand to perform an Item Action — some Items (One Use Only) must also be discarded after their Action. ITEMS AND OBJECTS — ITEMS: normal Items go in your Inventory, so no one but you knows exactly what you have found. QUEST ITEMS: at the beginning of the game, these cards are quests (horizontal side) — you can activate them by completing the required quest. HEAVY ITEMS: you can carry at most 2 Heavy Items, one in each of your Hand slots. If you want to change a Heavy Item you are carrying with another, simply drop it for free. OBJECTS: Intruder Egg, Intruder Carcass, Character Corpse — required for researching Intruder Weaknesses. They take up a Hand slot, like a Heavy Item. When you drop one of these, place its token in the Room you are in. COMBAT — you are in Combat every time you are in a Room with an Intruder. SHOOTING (cost 1): (1) Choose a Weapon and a target. (2) Discard an Ammo token from the chosen Weapon. (3) Roll a Combat die. If you hit, apply an Injury token, then draw an Intruder Attack card and check the Injury Effect. MELEE ATTACK (cost 1): (1) Draw 1 Contamination card. (2) Choose a target. (3) Roll a Combat die (rolls of 2 Hits are treated as 1 Hit). If you hit, apply an Injury token, then draw an Intruder Attack card and check the Injury Effect. If you miss, the Intruder deals you 1 Serious Wound. ESCAPE (SPECIAL MOVE ACTION, cost 1): (1) Choose a neighboring Room you wish to go to. (2) Draw an Intruder Attack card and resolve it. If the Attack is successful, resolve the Effect of the card. If you die, place a Character Corpse token in the Room you were in. If you survive, you move — resolve this move as usual (Explore a new Room, perform a Noise roll and so on). INTRUDER ATTACK: (1) Choose the targeted Character (the one with the fewest cards in their hand). (2) Draw an Intruder Attack card and resolve it: if any Intruder symbol corresponds to the Attacking Intruder type, the Attack is successful — resolve the Effect of the card. If there is no corresponding symbol on the card, the Attack misses. INTRUDER SYMBOLS: Larva, Creeper, Adult, Breeder, Queen.
PERSONAL REFERENCE ONLY // NEMESIS © AWAKEN REALMS // NOT FOR REDISTRIBUTION